Glue hands with the thumbs overlapping. Punch out nine "flames" with the hole punch. Depending on the size of the hand prints, you may want to cut out the "flames" in a different way or even draw them on.
Made these snowmen magnets by recycling old calendar magnets and Christmas sheet music.
Materials needed:
*magnets
*sheet music (I got mine here : Vintage Feedsacks )
*glue/mod podge
*foam brush
*buttons
*scrap of fabric
First I printed off the sheet music. Then I "aged" my music but placing it in a baking dish and brushing cooled used coffee grounds all over it. Then I let it dry.
I then used my "snowman shape" I had cut out of an old folder to trace on to the magnet and on the sheet music.
Cut them out and used mod podge to adhere the sheet music to the magnet. Make sure to use a thin coat on top to "seal" the paper.
Once dry I used acrylic paint, buttons and scrap fabric to create the details on the snowmen.
Today's post is something I had been wanting to learn to do for awhile. I would browse the craft store aisles and see this different kind of yarn on display. The one that looks like a ribbon, but when you opened it up looked like netting. I am still not a pro at crocheting and this new kind of yarn looked intimidating. I was pleasantly surprised that crocheting a "frilly scarf" out of the looped yarn is very simple.
I have found the best way for me to learn how to do something is if someone shows me. If someone demonstrates the steps, I am able to catch on pretty quickly. That is what happened here. I checked out youtube and looked at few videos before I settled on one I liked.
I highly recommend this video by Maggie Weldon:
She is clear and easy to follow. Depending on your level of expertise and how you learn, you may prefer another video. To make the scarf pictured above, I used the Premier Starbella yarn Spring Bouquet and in the demonstration pictures I used Premier Starbella yarn Canyon Sunrise. I used my "N" hook for this pattern.
If for some reason the video is not working here is my attempt to show you how to make this scarf.
You will first spread the yarn apart. With ribbed side down and netting on top, you will count out 8 loops on the very top.
Fold in half the 8 loops in half over itself.
Put your hook through the first double loop, then the second and so on for the remaining double loops.
This is the start of the scarf. Now you must decide if you are going to do 8 or 10 loops (or if you are experimenting maybe more? Let me know if you do and how it turned out). You will skip the first loop and go into the second. That is one. Skip the next loop and going into the fourth. Repeat this until you get 10 loops. You should have 11 loops (counting the doubles as one).
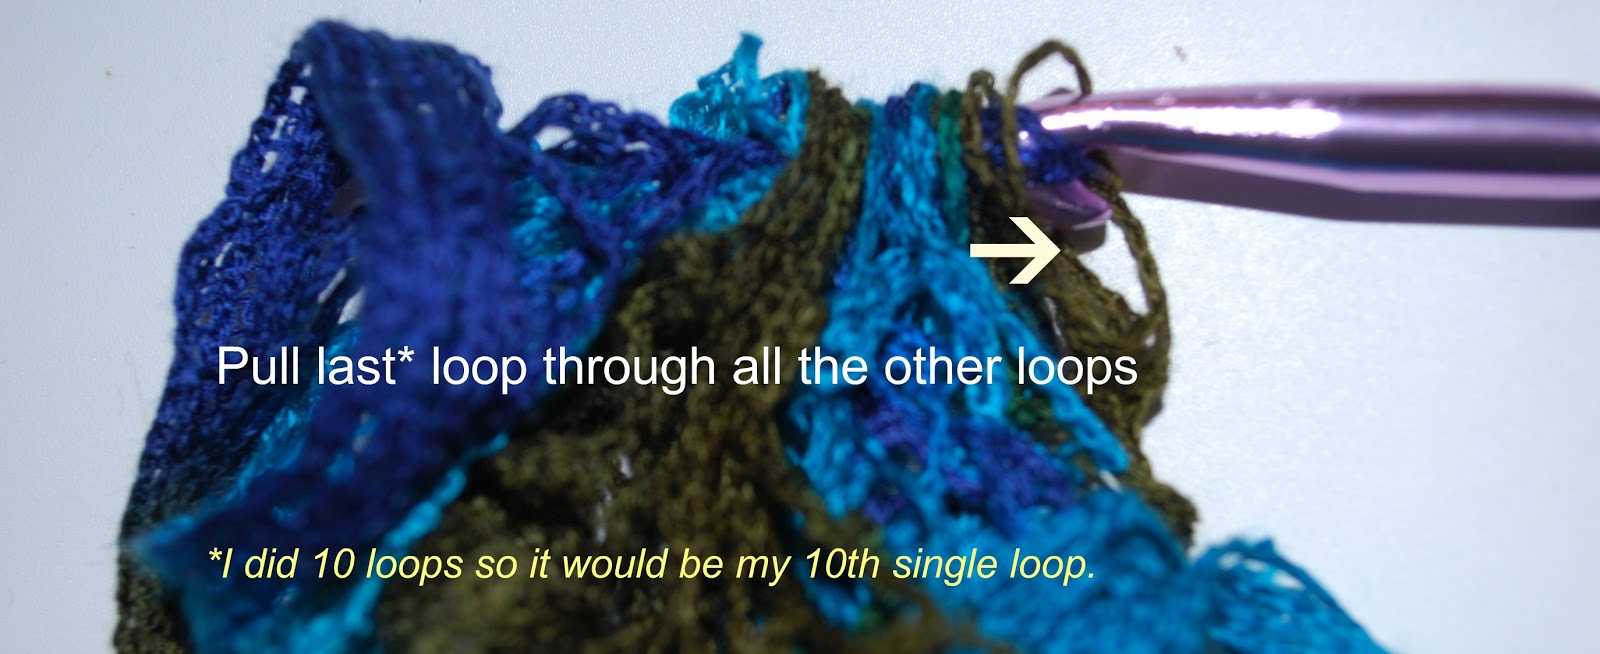
Pull the last loop all the way through.
Skip the first loop and go into the second. Skip the third and go into the fourth and so on until 10. Pull the 10th loop through. Repeat this pattern until you get to the end.
Once you have reached the desired length of the scarf, you will wrap the ribbon around the needle.
Pull through the loop. It should be tight enough to stay. If you are making a shorter scarf you will need to cut the yarn giving yourself about an inch or so of slack to wrap and pull through the loop.
Maggie said that if you want the scarf to be more fuller to go for 10 loops, which is what I did. It was a little tricky to get the hang of it at first because this type of yarn curls up on you and you must keep it separated as you crochet. She did say it could be made in about 30 minutes. She is a pro, so yes if you are as well, that time would be about right. I would say for me it was closer to 45 minutes.
Here is the finished scarf!
Another scarf I made.
This one took me about 30 minutes. Happy crafting!!
Back before the full swing of school began I had signed up to help with a Christmas luncheon at Princess's school. We were asked to bring 2 dozen cookies to share. I cringed. Normally I make my famous "spritz" cookies, but because I have been dealing with unpredictable migraines, I wasn't sure I would be able to make those. I needed something fairly easy.
Ingredients:
*1 tube of refrigerated sugar cookie dough
* 1 bag of M&M minis ( I actually took the time to separate the colors into prep bowls)
First preheat the oven according to the directions on the package. Cut the dough into 1/4-inch circles.
The colder the dough, the easier it is to slice.
Arrange the slices on an ungreased cookie sheet about 2 inches apart. Then using the M&M's make your "tree" design. I made the tree, while Princess topped it with the "star" and added the "trunk".
Bake according to the package instructions and cool on a wire rack. I have found allowing the cookies to sit on the cookie sheet for a minutes before transferring to the wire rack helps the cookie keep it's shape better.
After making 12 "trees", we decided to make "snowmen" for the other dozen cookies.
Then I got really creative with my Whovian-self and decided to attempt a "TARDIS" and the Doctor's "bow tie". Let me point out the Doctor Who Christmas Special is called "The Snowmen." I didn't realize I had made the perfect treat for the upcoming episode until after I snapped this picture.
Before we baked them.
Very easy and quick to make, especially if you are strapped for time. Merry Christmas!
I saw this kind of craft on Pinterest using tape to make words or shapes and having your child paint over the canvas and then removing the tape when the paint dries to reveal the shape/word. I thought it would be fun to attempt to make something that involves Christmas.
We made a manger scene.
Materials Needed:
*canvas (Artist's Loft Back-stapled traditional canvas found at Michael's)
*Nativity Template (this is what I created and you are free to download and use mine. Just know it is not completely even)
*paint (we used acrylic)
*paint brush
*contact paper
* Xacto knife
*cutting mat or board
You will first print out the Nativity Template or make your own "scene". With the shiny side up, place the contact paper (with backing still on), over the template. You may need to tape it down so that the contact paper doesn't curl up on you.
Cut the template out using the Xacto knife on your cutting mat. If you are using my template, I followed the black outlines until I got to the star. I cut where the star stuck out and not where it overlapped on the roof because that wouldn't be seen if it was a silhouette. Once the scene is cut out, stick it on the canvas. Press it firmly to the canvas and go over the edges to make sure it sealed. I used a quarter to go over the contact paper to help it stick better.
Now it's paint time. I asked Princess what colors she would like. She of course wanted to use all the colors we had. She had fun painting and mixing the colors.
Then we waited for the paint to dry.
Once the paint is dry, carefully remove the contact paper.
We just used some white paint and touched it up a bit.
And here is the master piece:
I really like it when science and art can come together and in this activity they do. With a few ingredients you can make your own "snowflakes" overnight.
Materials needed:
*mason jar or some kind of similar container
* 20 Mule Team Borax
*pipe cleaner
*string
*stick, pen or something similar to tie the snowflake to (I used a plastic fork)
*boiling water
*food coloring, optional
First cut your pipe cleaner into 3 equal lengths. It's okay if they are not exact because you can trim them later.
Next you will twist and shape them into a "snowflake".
My daughter's snowflake
My snowflake. I think I like her's better.
Make sure your snowflake can fit into the opening of your container. You may need to trim the ends to ensure it will fit. Then you can wrap the string around the pieces like we did or you can just tie the one end. Then wrap it around a stick or whatever you are going to use to allow the snowflake to hang in the water.
Now the ratio for the borax mixture is one cup of boiling water to 3 tablespoons of Borax. In order to cover the snowflakes in our jars we need about 2 cups of water so we used 6 tablespoons of Borax. Mix them together in the jar. Stir until dissolved. It is okay if the Borax doesn't completely dissolved. You may then add a few drops of food coloring to the water. We added 3 for our "blue".
Place your snowflake in to the jar and adjust the string so that the snowflake is completely covered in the water. Now you let the mixture sit overnight.
We made two more without the food coloring.
Snowflake in the making
And so we wait...
We did ours in the early afternoon and by bedtime the crystals were already forming. We took them out the next morning and this is what we found:
Very cool!
Princess calls her's "Spiderman's Snowflake"
The few drops of food coloring we used for Princess's snowflake did not make it a dark blue. It made a blue-ish tint to the crystals. Very pretty!