Thursday, November 29, 2012

DIY Tin Can Christmas Lanterns

I am sure you have seen various patterns and colors of tin cans upcycled to become a lantern. It is easy and fairly inexpensive to make. You could do this for any occassion or holiday. I chose to make my own for Christmas.
Luke 2:9-11


 Materials needed:
*tin cans
*nail
*hammer
*paint (I used white spray paint)
*candle


 Clean out the cans. Add water to the can and freeze them.

Once they are frozen you can take them out and will hammer in your design with a nail. I decided to spell out "NOEL" on one side and "Luke 2:9-11" on the other.

You don't need to hammer very hard to pierce the can.

 Then once the design was complete, I melted the remaining ice with warm water and dried the cans.Then I painted them them. I used about 2 coats. Then I added a piece of red ribbon on each can and placed a candle inside. Christmas lanterns complete!


Wednesday, November 28, 2012

The Calm Down Jar

I am hooked on pinterest and find some amazing things to try! One of them was the "Calm Down Jar".
I have to admit I was intrigued by the pretty glitter picture. I found another blogger had read about them and made one. It was her picture that got me interested.

The idea behind the calm down jar is an alternative to a time out. When a child (or maybe even an adult hehehe) is upset, they shake the jar to stir up the glitter. Then they sit and watch the glitter fall down to the bottom. When the glitter is mostly fallen to the bottom (or all the glitter has fallen--you decide) the child is "calmed down".

Soo what do you need for this fabbity fab idea??

*a clear jar (I used an old pickle jar, but it could be mason jar or maybe to make it anger-proof plastic jar)
* two tubes of glitter glue (we used pink and purple)
*half a tube of glitter (about a 1.5 tablespoons) (we used pink)
*few drops of food coloring (we used red and blue to make purple)
*water to fill the jar.
*baby oil


Pink and purple "Calm Down Jar"
Blue and Silver "Calm Down Jar"

Mix all the ingredients and now you have a calm jar. For the baby oil just a few drops is needed. Adjust as needed depending on the size of your jar. You can dress it up as much as you want or make it as simple as you want. If you use a bigger jar, you may need more glitter glue and glitter to get the effect. I noticed for us the smaller jar works much better.
Finished jar!

Reminds me of snow.
We prettied this one up and gave it to Princess's teacher for her pre-school class. I think I need one for me.


Tuesday, November 27, 2012

DIY Whovian Shirt

If you saw my post about the DIY stencil shirt (click the link to see how it's done) and scrolled down to the bottom you have discovered the "Whovian" shirt. And here she is:


Following the same directions and making a sketch of the famous TARDIS, I came up with my own stencil for a shirt.


Stencil pressed and painted.

My "TARDIS". Those squares were tricky but worth it!

And the final product again:


DIY Stencil Shirt

I love making shirts. This one was a new adventure for me. It involved making a stencil with words. I got nervous. But I really wanted to try this! (You can check out the pinterest picture here.) I also wanted to do something special for a non-crafter friend of mine. So here we are...


Materials needed:
*shirt, or fabric...honestly you could do this to any fabric
*FREEZER paper contact paper could work, but it will not give a clean edge like freezer paper...)
*iron
*fabric paint
*Xacto knife
*sponge brush
*quote or picture ( I used "But first, coffee")

Find the quote you want and print it out. I just typed mine in word processing program and printed it out.

Place freezer paper, shiny side down over the quote.. Tape to hold in place. Cut the letters out. 

Saying all cut out
Be mindful of the holes in the letters like the circles in O's and things. You need them when you paint so save them! Unless you are going for the completely filled in letters look.
The letter inserts. SAVE THEM.


Once the stencil is cut out, line it up on your t-shirt. Iron the stencil onto the shirt using the iron on low setting. Make sure you get all the edges. Place a piece of cardboard inside the shirt to prevent the paint from soaking through to the other side.


With a sponge brush, brush the paint on to the shirt. The brand of paint I used suggested 1-2 coats of paint. I used two. Let the paint dry. My paint said 4 hours.


 Take off the stencil. You many need to turn the shirt inside out to press the paint with the iron to set it so be sure to check the paint label! The paint I used did not suggest a press with an iron. All done! You could easily use this for your favorite quote, bible verse, anything! And it doesn't have to be on a shirt. You could add this to a canvas bag or something similar. Happy crafting!!


This a gift for a non-crafty friend. And she loved it. ♥

And for the Whovian in your life:


Monday, November 26, 2012

The easy peasy scarf.

Scarves, scarves and more scarves. Love them. I want them all. However, since I can't afford to just buy all the scarves I want, I can make them. Did you see my Doctor Who scarf? But what if you don't know how to crochet or more importantly, you don't have time to crochet? And you just want to make something fun and easy? Then how about this fun scarf that can be found on pinterest?


It's made from a T-shirt. No really it is.

Materials:
* extra-large t-shirt
*9 inch paper plate
*scissors
*fabric pencil/marker
*fabric glue (or if you prefer needle and thread or if you have a sewing machine)
*embellishment (opitional, I used a flower)

You will trace the plate on the shirt using the fabric marker. You need about 8 circles. I used large t-shirt and it had some small writing in the left corner so I only got 6 circles out of the shirt. I also did not trace my plate. I just cut around the plate. No need to worry about super-straight edges on this one. So don't worry about that as you cut. I also cut through both layers so I didn't have to cut 6 times, just 3.


Cut each circle into a spiral shape. Then you will stretch each piece. The edges will curl up.


Put a bit of glue on the end of one piece and attach another. Let them dry. You will repeat this for the remaining pieces so now you will have 4 or in my case, 3 long strips. I did not have any fabric glue, well truth be told I don't know where mine is. My sewing machine was out so I just used a very simple stitch to tack the pieces together. I didn't even worry my thread was orange!


 With a scrap tie them together at the half .


You just made a cute scarf. Now you can add flower or something extra if you would like to your new scarf. I added a red flower and asked my favorite girl to model this new creation.


Saturday, November 24, 2012

Christmas Carol Candle Holder

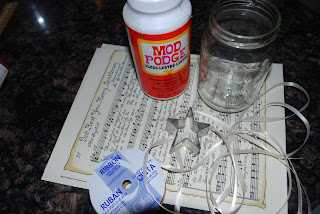
Today's craft is making another small candle holder using a mod podge effect. Because Christmas is around the corner I decided to make it with the holiday in mind.


Materials needed:
* mason jar (I used an old pickle jar)
* copy of sheet music (I printed this sheet music off here: VintageFeedsacks )
*scissors
*Xacto knife
*pencil
* star stencil
* ribbon
*Mod Podge
*sponge brush.


First I measure out how I wanted the music to lay on the jar and where I wanted the "star" cut out to be. I cute the music into small squares, but allowing the words to remain in order. I cut the title seperately.
Then I traced the star stencil and cut out the stars using an Xacto knife. I ended up with 3 windows. 


I then put a thin layer of the mod podge onto the jar. Brushed some of the glue onto the back of one of the slips of paper. Placed the paper onto the jar. Repeated for the remaining pieces. After all were placed, I then brushed a layer of mod podge onto the jar to seal the paper to the jar. 


I let it dry and then I tied a ribbon to the top of the jar. I added some salt to the bottom of the jar to help my tea light stay in place, but you don't have to.


 Christmas carol candle holder complete! 


Wednesday, November 21, 2012

Turkey Roll

This is another easy kid craft.


Materials needed:
*colored paper ( or have the kids color on white paper)
*pencil/pen
*stapler, tape and glue
*paper tube


I used a paper towel tube and cut it in half. Covered it with postal paper. You could leave it uncovered or cover it with brown paper or whatever you would like.


Traced the Princess's hands onto the construction paper. Cut them out. Then we stapled the "turkey feathers" (hands) on to the tube. Glued on googly eyes, a beak and a gobble. Turkey time!


Turkey with Leaf Feathers

We have had some nice weather this fall. Because of where we live, snow and cold is just around the corner and we need to get out and enjoy the nice sunshine while we can. While we were out playing in the leaves, I had Princess collect the leaves she liked the most so that we could make our own Turkey with Leaf Feather (you can see an example here Pinterest --YES another idea from Pinterest.)


Materials Needed:
*leaves
*glue
* one large brown circle
* one smaller circle
*crayon and marker
*sheet of paper.

Arrange and glue leaves to paper in a semi-circle.


 Glue big circle to the leaves. This will be the body of the turkey.

 Glue smaller circle on top of the bigger circle. Glue on eyes, or draw the eyes.


You could use a small leaf for the beak and gobble or colored paper or even draw them on.


We went one step further. I cut some contact paper the same size as the sheet of paper and covered it. I was afraid the leaves would crumble and fall off. Ta-da! A turkey made from leaves!!
I know, not the best picture, but you get the idea.

Thanksgiving/Fall candle holder

Here is another Thanksgiving/fall craft that you can do. While my princess was gathering leaves for her craft, I gathered  few of my own to use for a candle holder. Here is one you can find on pinterest.

Materials needed:
*glass candle holder
*mod podge
*sponge brush/applicator
*leaves
*tea light


Gather your leaves. Spread an even coat of mod podge one side of the candle holder.


Take a leaf, spread mod podge on one side of the leaf and then place the gluey side to the prepped side of the candle holder.

Apply another even coat of mod podge on the entire side, including the leaf to seal it. Repeat this for all the sides.

Wait until it dries. Place a tea light inside. Beautiful!